Important: The functionality described on this page is only available to early adopters.
Veeva AI agents use a Large Language Model (LLM) to perform a set of agent actions in Vault and determine the actions and responses Veeva AI Chat can provide to users. You can define the agent’s objective, context, and action’s instructions, which inform the LLM of the agent’s role, responsibilities, and parameters in which it can operate, ensuring agent actions are executed as you intend. A Vault can include standard and custom agents. This article describes how to configure custom agents for use in your Vault.
agents are Vault-specific, meaning they cannot interact with data on other Vault domains or outside of your Vault. In addition, if no agents are enabled in your Vault, users cannot interact with the Veeva AI Chat window.
See below for definitions of terms used in this article:
- Agent: Defines a set of agent actions that can be performed on a document or object record in your Vault.
- Agent Objective: A description of the agent’s roles and responsibilities, similar to a job description.
- Agent Context: Defines the information an agent knows about your Vault, allowing the agent action to return this information in a response. Agent context can include document content and data such as document fields, object fields, and object relationships.
- Agent Action: The actions users can select in the Veeva AI Chat window, such as Summarize Document and Translate Record. agents perform agent actions based on the provided agent objective, context, and instructions.
- Agent Tools: You can assign agent tools to agent actions. When an agent action is executed in Veeva AI Chat, your LLM can request agent tools and use Vault’s tool response to complete the agent action.
Configuration Overview
The following list is an overview of configuring custom agents in your Vault:
- Configure a custom LLM Connection if you are not using a Veeva-provided LLM connection. This action establishes a connection between your Vault and your LLM.
- Set up your custom LLM connection details in Admin > Settings > Veeva AI Settings.
- Configure the agent objective using a description of the agent’s intended roles and responsibilities.
- Configure the parameters of the agent context.
- Configure the agent action by defining a description and instructions on how to execute the action.
- Optional: Assign an agent tool to the agent action.
Configuring a Custom LLM Connection
If you are not using a Veeva-provided LLM, you must set up a connection that allows Vault to communicate with your own LLM provider. This connection is required so agents can send Vault data to your LLM, which allows it to understand how to execute and respond to agents. To begin establishing the custom LLM connection, set up an LLM Connection Authorization record.
When configuring a custom LLM connection, it is recommended to enable a guardrail in your LLM account provider. This feature allows you to prevent Veeva AI Chat from engaging in inappropriate conversations. We recommend selecting the Standard content filter in AWS Bedrock and the default guardrail in Azure AI Foundry.
AWS Bedrock Connection
If you are using an AWS Bedrock LLM, ensure you have following information before beginning this process. You can find this information in your AWS Bedrock LLM account:
- Access Key
- Secret Access Key
- AWS Region
- Model ID
Follow the steps below to create the LLM Connection Authorization record for an AWS Bedrock LLM:
- Create a Connection Authorization record and select Client Credential as the Connection Type.
- Enter a Name for this connection.
- Set the Status to Active or Inactive. By default, new Client Credential Connection Authorization records are created in the Active status.
- Enter your Access Key in the Client ID field.
- Click Save.
- Select Set Client Secret from your new Client Credential Connection Authorization record’s Actions menu.
- Enter your Secret Access Key in the Client Secret and Confirm Client Secret fields.
- Click Save.
- Create another Connection Authorization record and select LLM as the Connection Type.
- Enter a Name.
- Enter an API Name.
- Select AWS Bedrock from the Provider drop-down.
- Enter the Model ID in the Model Name field.
- Select the Client Credential Connection Authorization record you configured in steps 1-5 from the Authorization drop-down.
- Enter the AWS Region in the Region field.
- Click Save.
The LLM Connection Authorization record is now available for an AWS Bedrock LLM connection. Next, select your default LLM connection.
Azure AI Foundry Connection
If you are using an Azure AI Foundry LLM, ensure you have following information before beginning this process. You can find this information in your Azure AI Foundry LLM account:
- API Key
- Azure Open AI endpoint
- Model ID
Follow the steps below to create the LLM Connection Authorization record for an Azure AI Foundry LLM:
- Create a Connection Authorization record and select API Key as the Connection Type.
- Enter a Name for this connection.
- Set the Status to Active or Inactive. By default, new Client Credential Connection Authorization records are created in the Active status.
- Click Save.
- Select Set API Key from your new API Key Connection Authorization record’s Actions menu.
- Enter the API key in the API Key and Confirm API Key fields.
- Click Save.
- Create another Connection Authorization record and select LLM as the Connection Type.
- Enter a Name.
- Enter an API Name.
- Select Azure from the Provider drop-down.
- Enter the Model ID in the Model Name field.
- Select the API Key Connection Authorization record you configured in steps 1-5 from the Authorization drop-down.
- Click Save.
The LLM Connection Authorization record is now available for an AWS Bedrock LLM connection. Next, select your default LLM connection.
How to Set Up Veeva AI Settings
Veeva AI Settings allows you to set up details related to your custom LLM connection. You can select your basic and advanced LLM connection, enter a default AWS guardrail, and enter a custom LLM connection’s maximum token output.
If you are using Veeva-provided LLM connections, you can skip many of these settings.
To set up your Veeva AI Settings:
- Navigate to Admin > Settings > Veeva AI Settings.
- Click Edit.
- Select the Basic LLM and Advanced LLM connection. You can select your custom configured LLM for either option or Veeva AI Basic and Veeva AI Advanced for Veeva-provided LLM connections. Your custom agents will operate based on the selected LLMs. It is recommended to use Basic LLM for agents that perform simple actions, such as Summarize Document and Advanced LLM for agents that perform complex actions, such as those that require agent tools.
- If you are using a custom AWS Bedrock LLM connection with a guardrail configured, enter the Default AWS Guardrail ID and Version.
- Optional: Clear the Auto-switch Chat Conversation setting if you want to remove the conversation switching ability in Veeva AI Chat.
- Enter your custom LLM connection’s number of Maximum Output Tokens. You can enter a maximum of 10,000 and minimum of 512 tokens. The default is 4,096. If Basic LLM and Advanced LLM are both custom LLM connections, this field covers the maximum token output for both LLMs.
- Click Save.
Your Veeva AI settings are now established. You can return here to change any of these settings if necessary.
You can also use Veeva AI Settings to track your LLM token usage.
Note: Standard and system-managed agents use Veeva AI Basic and Veeva AI Advanced respectively. You cannot change these settings on standard and system-managed agents.
Test Your LLM Connection
Use the following steps to test your LLM connection to ensure there are no issues:
- Ensure you have a security profile with the necessary permissions to configure custom agents and use Veeva AI Chat.
- Navigate to Admin > Agents > Base Document Chat Agent > Actions > Edit.
- Set the Status to Active.
- Click Save.
- Navigate to a document in your Library.
- Click the Veeva AI icon (
 ) in the upper right of the Vault interface when viewing a document via the Doc Info page.
 - Select Summarize Document.
If your LLM connection is properly configured, Veeva AI Chat responds with a document summary. You can now begin configuring custom agents.
Standard Agents
By default, your Vault includes two standard agents with the following agent actions:
- Base Document Chat Agent
- Summarize Document
- Translate Document
- Ask Questions
- Base Object Chat Agent
- Summarize Record
- Translate Record
- Ask Question
These default agent actions are only available to your users if you activate the Base Document Chat Agent and Base Object Chat Agent in your Vault. You cannot edit or delete standard agents or any of their agent objectives, context, or actions.
These agents fall under the Base Document Class and Base Object Class respectively. Currently, when configuring a custom agent, you can only create agents within these classes.
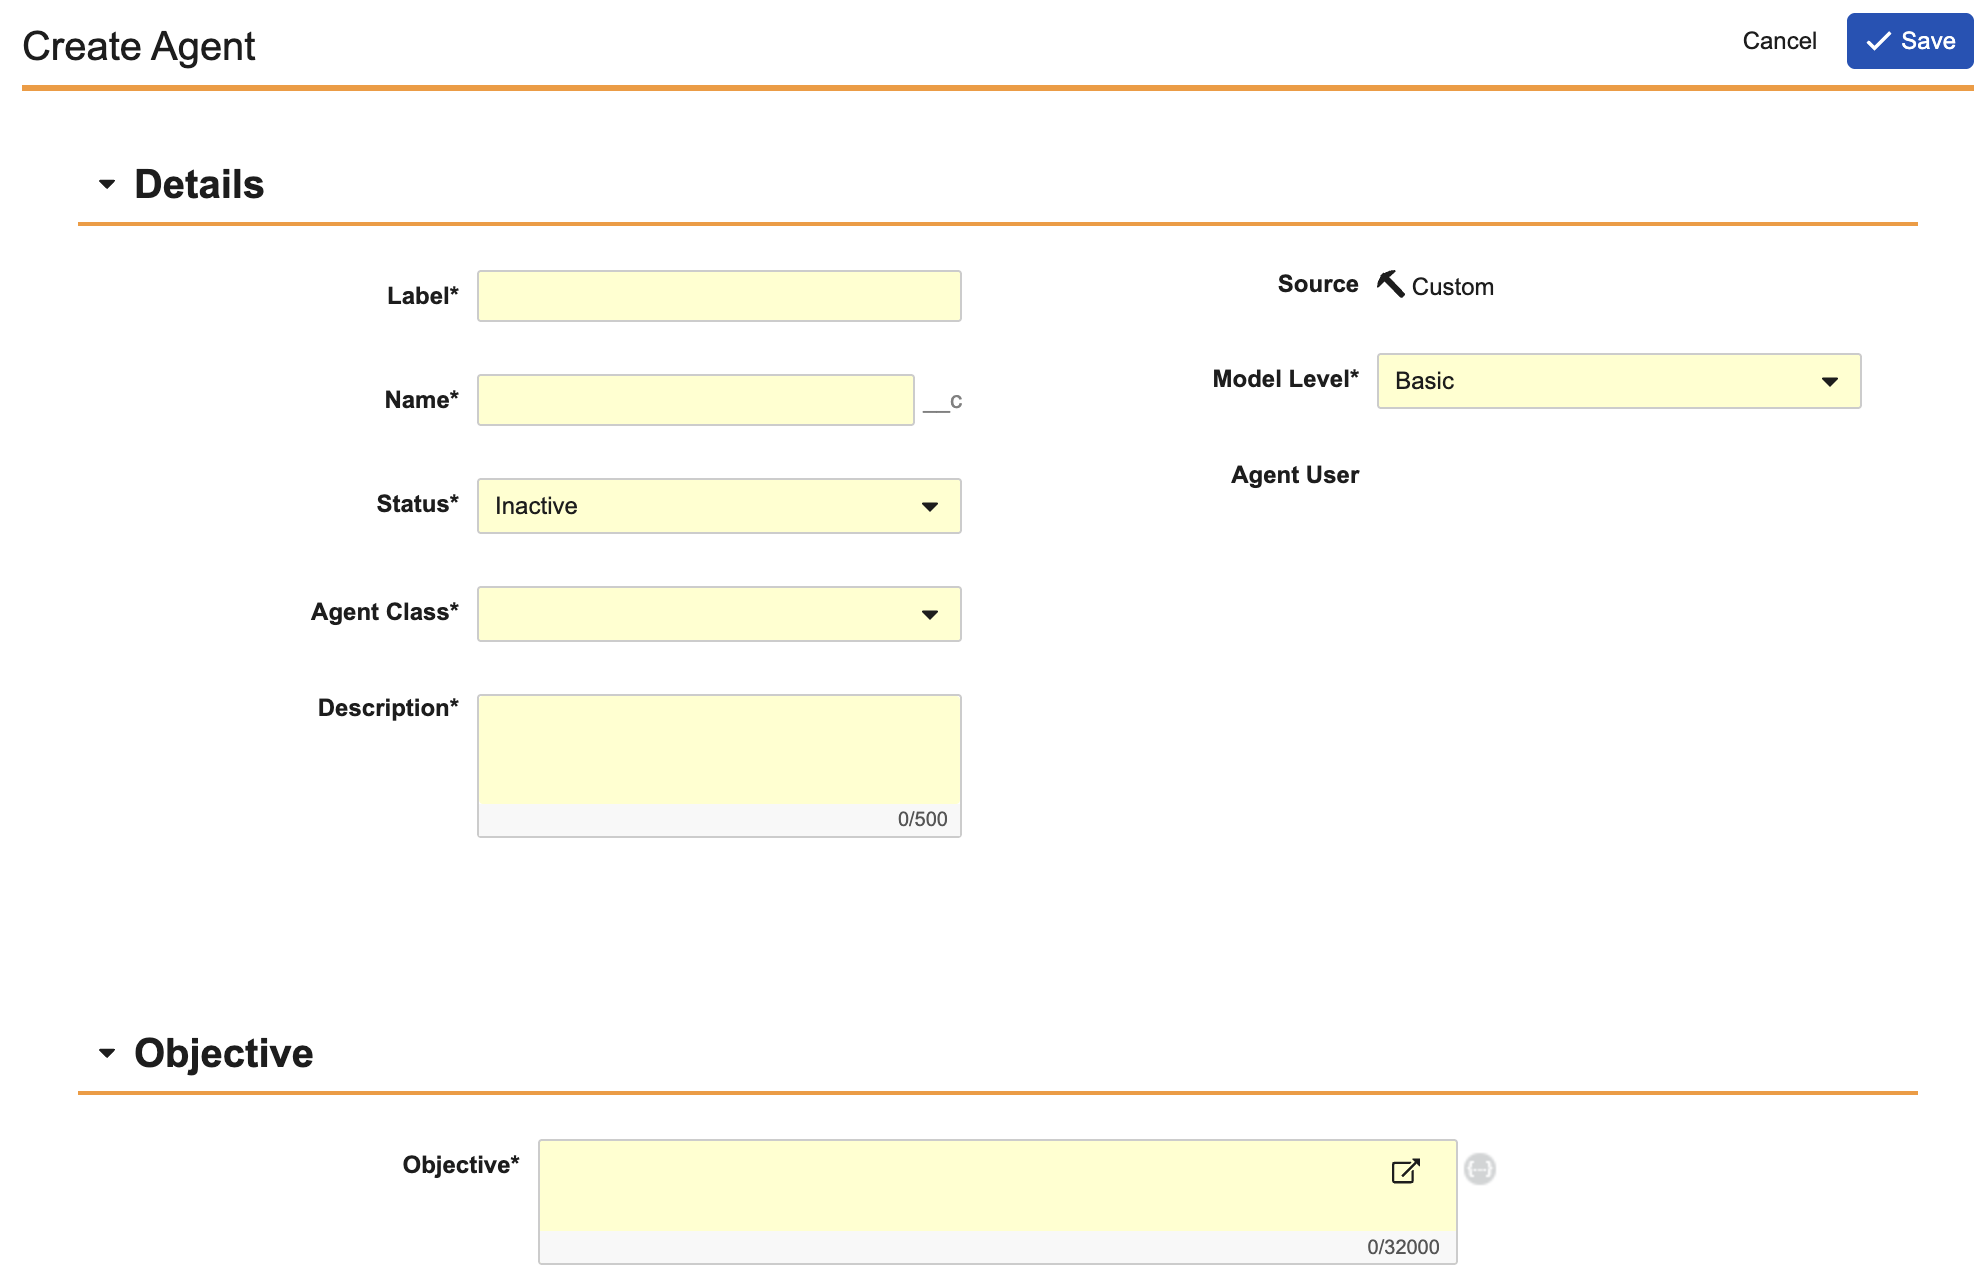
How to Configure a Custom Agent
To configure a custom Agent:
- Navigate to Admin > Configuration > agents.
- Click Create to access the agent Configuration page.
- Enter a Label. The Name value is populated based on the Label.
- Set the Status to Active or Inactive. By default, new agents are created in the Inactive status. If the agent is Inactive, its related agent actions are not displayed in Veeva AI Chat. An agent action is required to set the Status to Active. Once activated, an agent user is either created or reused if available.
-
In the Agent Class drop-down, select Base Document Class to create a document agent or select Base Object Class to create an object agent. You cannot undo this selection.
- If you selected Base Document Class, select the Document Type where this agent can perform agent actions.
- Optional: If you selected Base Object Class, select the Primary Object and Object Type where this agent can perform agent actions.
- Enter a Description. Ensure the description is clear and precise as Vault sends this information to your LLM to help it understand the basic purpose of the agent.
- Select the agent’s Model: Basic or Advanced. This setting determines whether the agent will operate with your Basic or Advanced LLM.
- Enter the agent’s Objective. This description should reflect the roles and responsibilities of the agent. You can write the description as if you are talking to the agent. For example, a Site Visit agent objective could read, “Your primary objective is to summarize, quality check, and translate specific site visit object records.” Use field reference syntax to include attributes such as fields, labels, and user names in the agent objective. Select the {…} icon to insert object or document-related tokens into the agent objective.
- Optional: Enter a Supplemental Objective. This field is only available on standard and system-managed agents based on application family availability. Use supplemental objectives to add supporting information to the agent objective. Supplemental objectives are not meant to replace the original agent objective.
- Click Save.
The basic details on the agent are now configured. Next, configure the agent context.
Note: You can use Bulk Translation to translate the Label field on agents and agent actions.
Agent Users
When a custom agent is activated, Vault creates and assigns an Agent User record to the agent. The agent user allows agent actions to execute without a user at the keyboard, such as through a job or email processor.
Once the agent user is assigned, the Agent User field on the Agent Configuration page is populated with a link to the Agent User record. These records are system-managed and include the following fields:
- Username: A username that follows a specific pattern:
[agent][agent_name]@domain.com. For example,[agent]deviation__c@vernbio.comis the Deviation agent’s agent user. - Email:
no-reply@veeva.com - First Name: Agent Label in the Vault’s base language. For example, Deviation. If the agent’s Label is updated, this field is updated as well with the new Label.
- Last Name: Agent
- Language: Base Vault Language
- Locale: Base Vault Locale
- Time Zone: Default Vault time zone
- Security Policy: System Managed
- License Type: Full
- Application License: Null
- Security Profile: Read-only User
You can only edit the Security Profile and any custom fields added to the User object on Agent User records. Some fields, such as Language, Locale, and Security Profile, may vary for standard agents based on application.
If an agent is deleted, Vault sets the agent user’s Status to Inactive. Vault can reuse this agent user if a new agent is created or activated with the same Name.
Note: You cannot log in as an agent user in any scenario, such as using delegation access. In addition, you cannot associate a Person record to an Agent User record.
Changing an Agent’s Name
If the agent’s Name changes, Vault creates a new Agent User record using the new agent Name and deactivates the previous Agent User record. If an Agent User record already exists with the agent’s new Name, Vault reuses that record and associates it to the agent. For example, Vault A contains an agent (agent1__c) associated with an agent user ([agent]agent1__c@vernbio.com). The agent’s Name is updated to agent2__c. Then, Vault creates or reuses an Agent User record with the Name [agent]agent2__c@vernbio.com.
Note: Changing an agent’s Name may break API integrations.
Username on Multiple Domains
Custom agents can have the same Name on multiple Vaults within the same domain. This scenario causes each agent user to have the same username on each Vault. In this scenario, the agent user’s First Name is updated based on the agent in the corresponding domain. For example, Vault A contains an agent with the following details:
- Name:
product__c - Label: Product
- Agent User User Name:
[agent]product__c@vernbio.com
Vault B on the Vault A domain contains an agent with the same Name and Label. In this case, if the Vault B agent is assigned an agent user, the First Name of the agent on Vault A changes to Product2 while Vault B creates an agent user based on the existing domain agent user with First Name set to Product.
Audit Behavior
When an agent user is associated with an agent, any agent actions executed without a user at the keyboard are logged in the audit trail as performed by the agent user. If the agent action executes agent tools that generate audit entries, such as creating or updating records, the agent user is also logged as the user performing those actions. This includes updates to Created By and Last Modified By fields.
In the case of agent actions executed by jobs, the agent user is logged in the audit trail only if it or a group is assigned to the Job Owner role.
Agent actions executed by a user at the keyboard, such as through Veeva AI Chat, with an agent user assigned to the agent are logged as [agent user's user name] on behalf of [keyboard user's user name].
How to Configure Agent Context
Agent context defines information about a document or record available to an agent action when it is executed. The agent action uses this information to return relevant details to users in Veeva AI Chat. For example, if you configure a Summarize Document action to perform a spell check, you can use the agent context to instruct the agent action to spell check only the document text, certain fields in the document, or the document source file.
You can also use agent context to instruct the agent action to return specific field values on a record. For example, a Summarize Record action could return the Last Modified Date value and show a timeline of changes to the record.
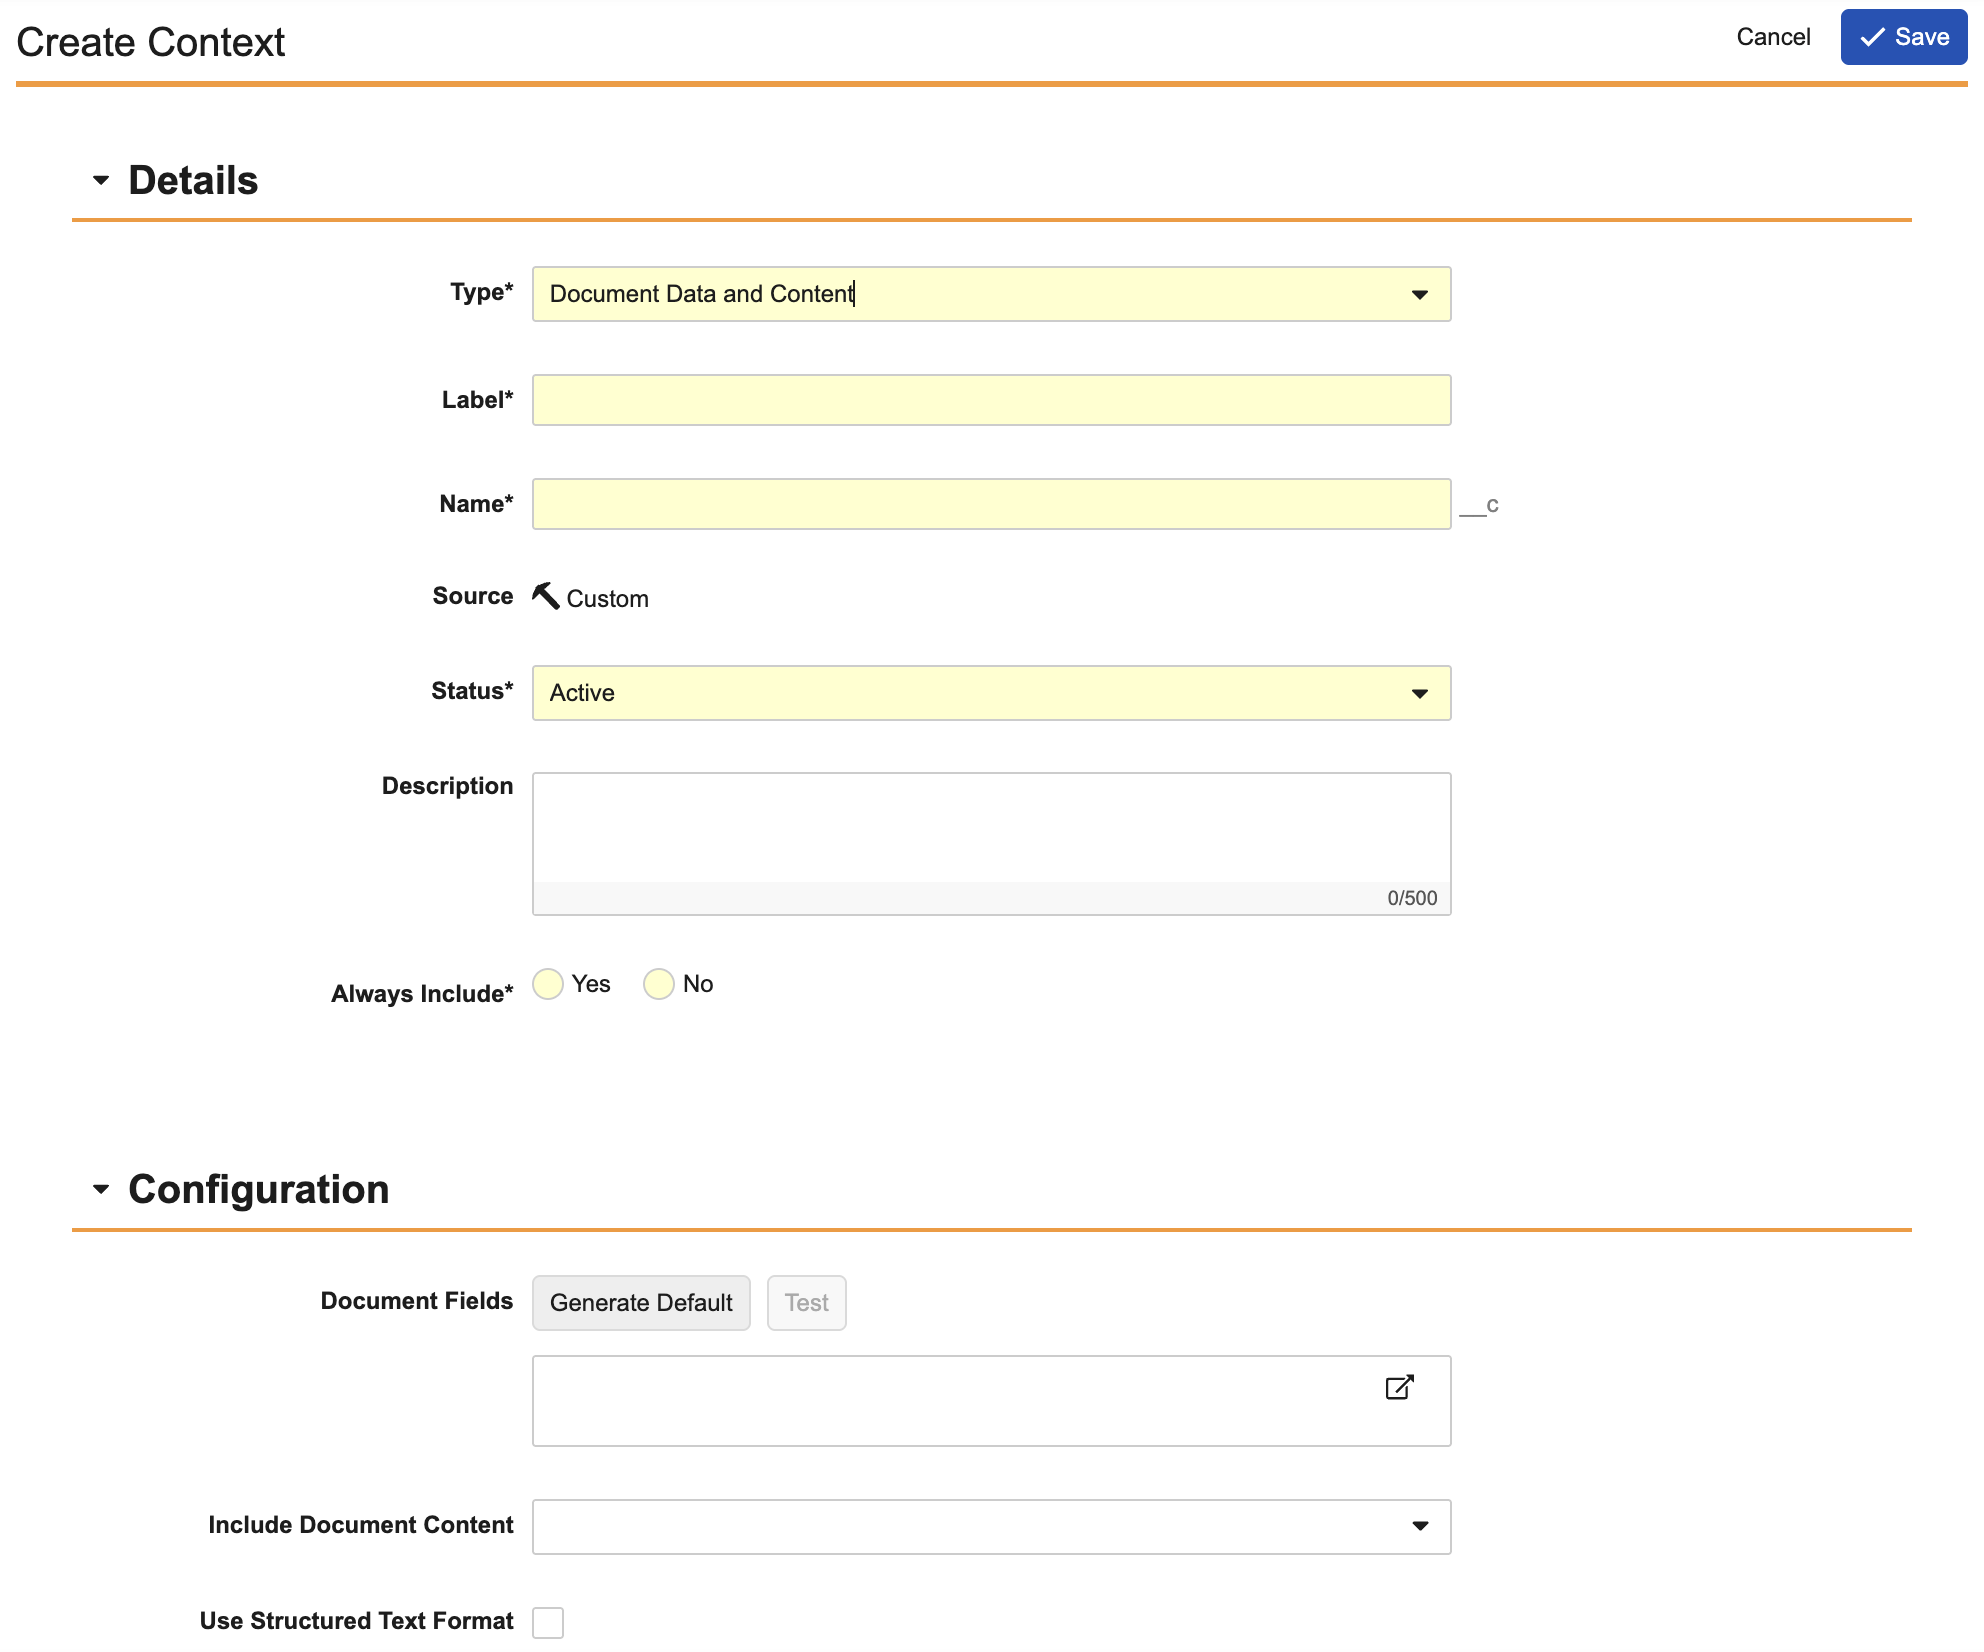
How to Configure Document Agent Context
To configure agent context for a Base Document Class agent:
- Select Context on the Agent Configuration page.
- Click Create.
- Select Document Data and Content or Related Document Data and Content from the Type drop-down.
- Enter a Label. The API Name value is populated based on the Label value.
- Set the Status to Active or Inactive. By default, new agent context is created in the Active status.
- Optional: Enter a Description. Ensure the description is clear and precise as Vault sends this information to your LLM to help it understand and execute the agent context.
- Select Yes on the Always Include setting to automatically include this agent context with each agent action configured in this agent. Select No to manually include the agent context with each agent action as necessary.
- If you selected Related Document Data and Content, select a Relationship Type. Only Single Use document relationships are available for selection.
- Optional: Enter Document Fields to prompt the agent action to display the field label and values in the Veeva AI Chat response. This field is required if you do not select an option from the Include Document Content picklist. You can click Generate Default to display a template you can use to enter the document fields. After saving the agent context, click Test to view the template’s output with a document.
- Optional: Select one or more options from the Include Document Content picklist: Text, Images, or Source File. Select Text to include all document text in the agent action. Select Images to export each page in the document as an image. Select Source File to include the document’s source file in the agent action. This field is required if Document Fields is left blank.
- Optional: Select Use Structured Text Format to prompt the agent action to respond in an XML-based format that separates each page of content with XML tags.
- Click Save.
The agent context is now available for use with agent actions configured within your Base Document Class agent. Next, configure the agent actions.
Note: If Images is selected, only the first 20 pages are included with an agent action.
How to Configure Object Agent Context
To configure agent context for a Base Object Class agent:
- Select Context on the Agent Configuration page.
- Click Create.
- Enter a Label. The API Name value is populated based on the Label value.
- Set the Status to Active or Inactive. By default, new agent context is created in the Active status.
- Optional: Enter a Description. Ensure the description is clear and precise as Vault sends this information to your LLM to help it understand and execute the agent context.
- Select Yes on the Always Include setting to automatically include this agent context with each agent action configured in this agent. Select No to manually include the agent context with each agent action as necessary.
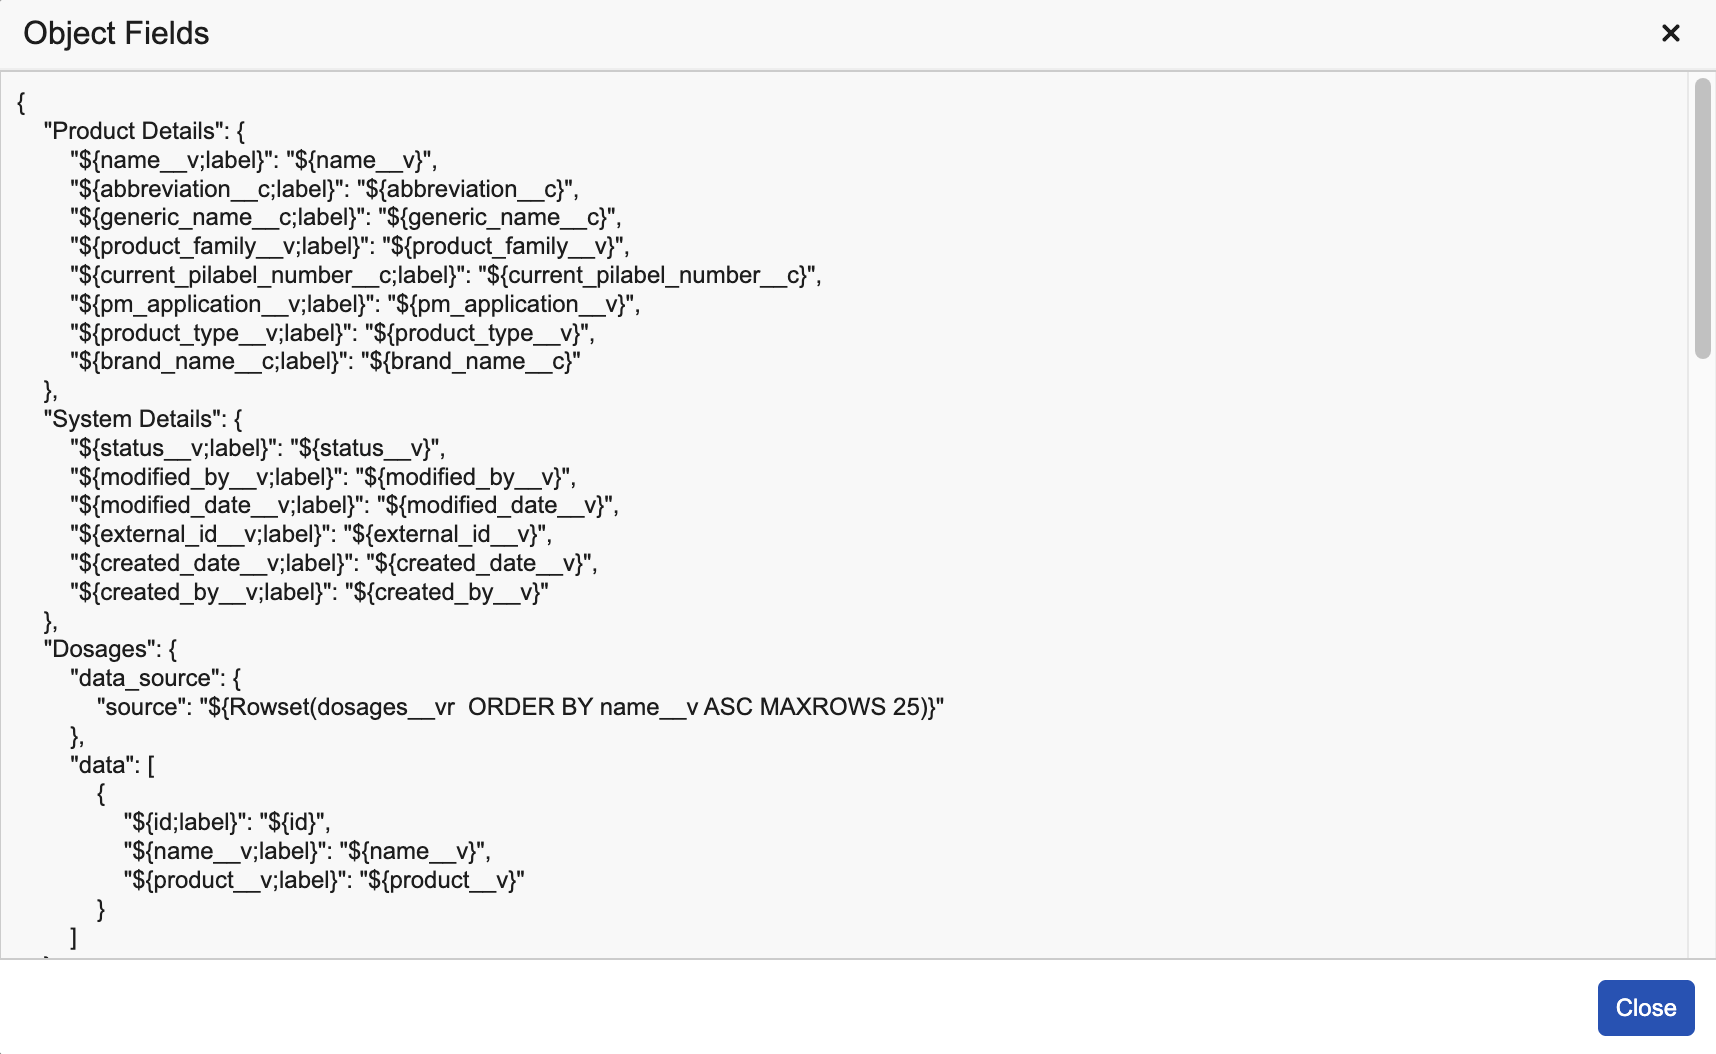
- Enter Object Fields to prompt the agent action to display the field labels and values in the Veeva AI Chat response. You can click Generate Default to display a template you can use to enter the object fields. After saving the agent context, click Test to view the fields used with an object record.
- Click Save.
The agent context is now available for use with agent actions configured within your Base Object Class agent. Next, configure the agent actions.

Agent Context Field Configuration
Agent context with document or object fields prompts the agent action to extract the field values and display them in Veeva AI Chat responses. For example, you can use agent context to prompt the Summarize Document action to return the Name, Created Date, and Last Modified Date of a document the user is viewing in Vault. You can also use agent context to return field values from related and child records in a Summarize Record action.
Click Generate Default to display a template you can use to add fields to the agent context. Document agent context templates include fields from the agent’s selected Document Type and those available on the Doc Info page. Object agent context templates include fields from the assigned layout of the agent’s Primary Object and any child or related objects. You can use Microsoft Word template syntax and field reference syntax when modifying the template to reference specific field values and labels.
Note: If the MAXROWS clause is used in a ${Rowset()} in the document or object field configuration, it can only return up to 2,000 records. If MAXROWS is not used, up to 25 related object records are returned.
Document Agent Context Example

Object Agent Context Example
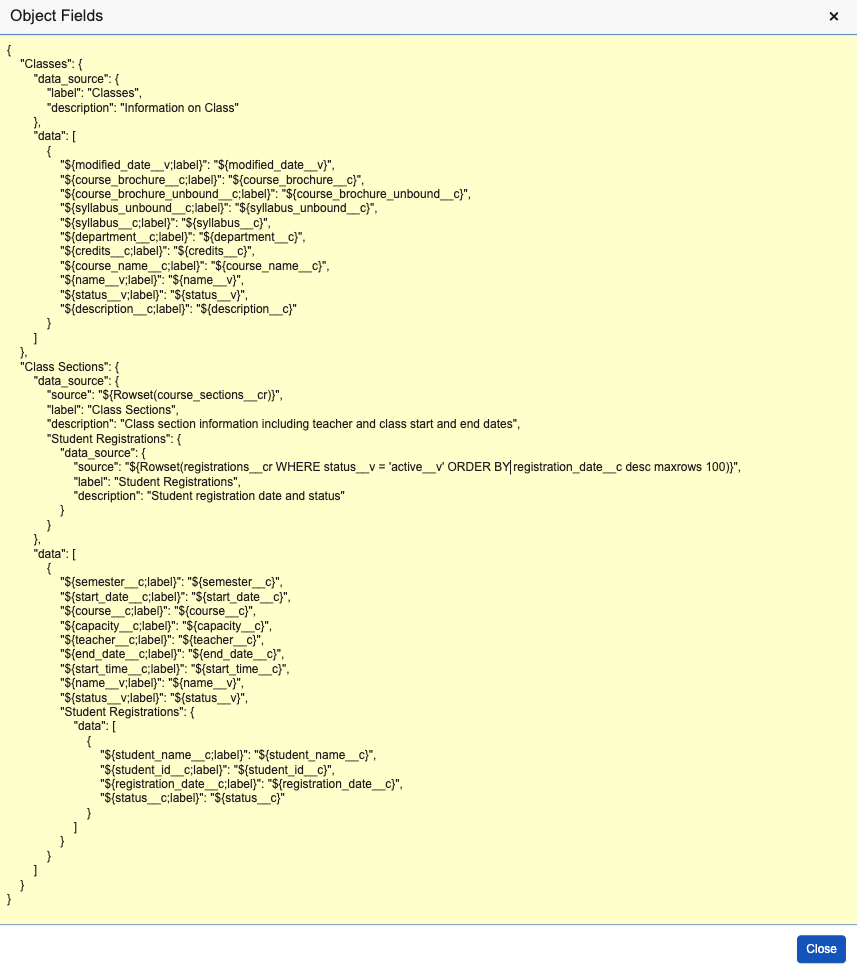
You can use the template to access child and grandchild records. For example, Class Section is a child of Class, and Student Registration is a child of Class Section. In this case, the template would appear as displayed in the image below.
In this example, a WHERE clause is used in the ${Rowset()} syntax to filter out inactive records as this syntax returns both active and inactive records by default.
Note: You can reference the following fields in agent objectives, agent actions, and document and object agent context fields using Microsoft Word template syntax:
- User Name:
user__sys.username__sys - Name:
user__sys.name__v - First Name:
user__sys.first_name__sys - Last Name:
user__sys.last_name__sys - User’s Language:
user__sys.language__sys - User’s Locale:
user__sys.locale__sys
Test Output
You can test the output of your document and object fields to ensure the values are populated as expected. To test your output, save the agent context, then click Test next to the Document Fields or Object Fields. When testing the output of document fields, you must select a document version based on the agent’s document type. When testing the output of object fields, you can only select records from the Primary Object or object type if available.
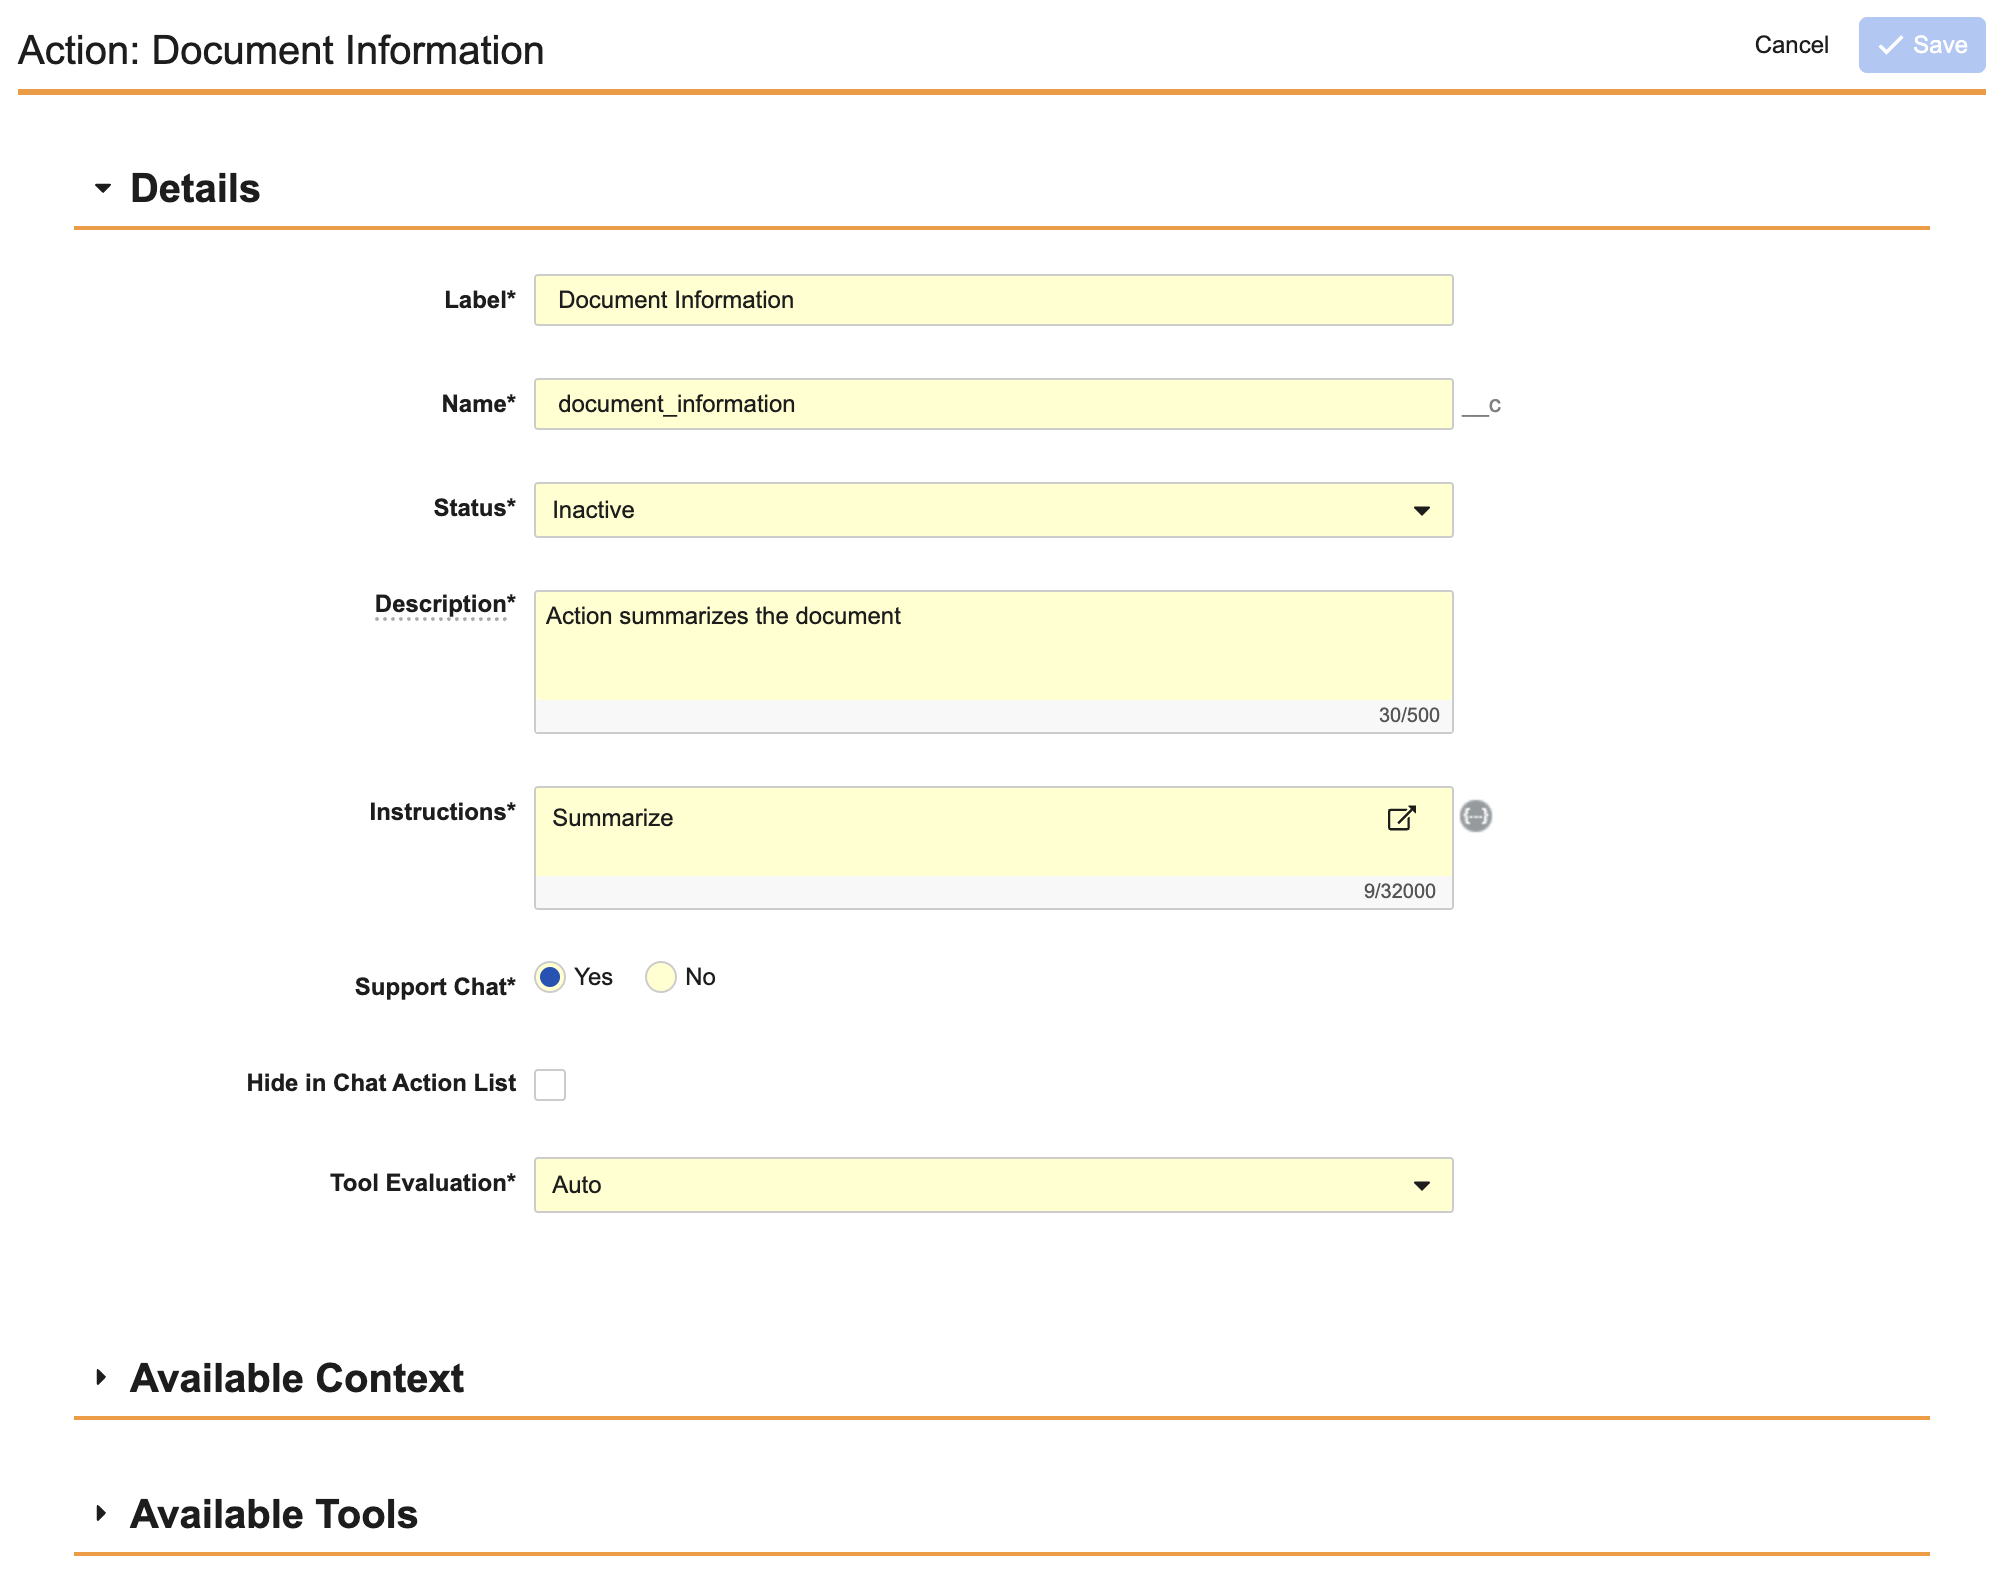
How to Configure Agent Actions
Agent actions define the tasks an agent can execute through Veeva AI Chat. Agent actions follow the specific instructions you provide as well as any assigned agent context or agent tools. It is important to ensure the instructions are clear and precise, as ambiguity can lead to errors when the agent action is executed.
To configure an agent action:
- Select Actions on the Agent Configuration page.
- Click Create.
- Enter a Label. The API Name value is populated based on the Label value.
- Set the Status to Active or Inactive. By default, new agent actions are created in the same status as their associated agent.
- Enter a Description of the agent action. Ensure the description is clear and precise as Vault sends this information to your LLM to help it understand the agent action.
- Enter the agent action’s instructions. Your LLM uses these instructions to understand how to execute and respond to the agent action. Select the {…} icon to insert object or document-related tokens into the instructions.
- Select Support Chat to display this agent action in the Veeva AI Chat window. Select No to hide it from the Veeva AI Chat window. Leave this field unselected to hide the agent action from the chat window.
- Select Hide in Chat to hide this agent action from the Veeva AI Chat window. The chat window can still route to this agent action based on the user’s input. This field is available only if Support Chat is selected.
- Click Save.
Your agent is now configured and users can select the agent actions in Veeva AI Chat.
Writing Agent Action Instructions
When writing the agent action’s instructions, you can use simple instructions, such as “Summarize document” or slightly more complex details that define the structure of the agent action’s response. For example, if you are configuring a Summarize Document agent action, your instructions could prompt the agent action to respond with a header for a one-line summary, specific document metadata, and related documents.
To reference field values from the primary object, related objects, or documents, use Word formatted output field reference syntax.
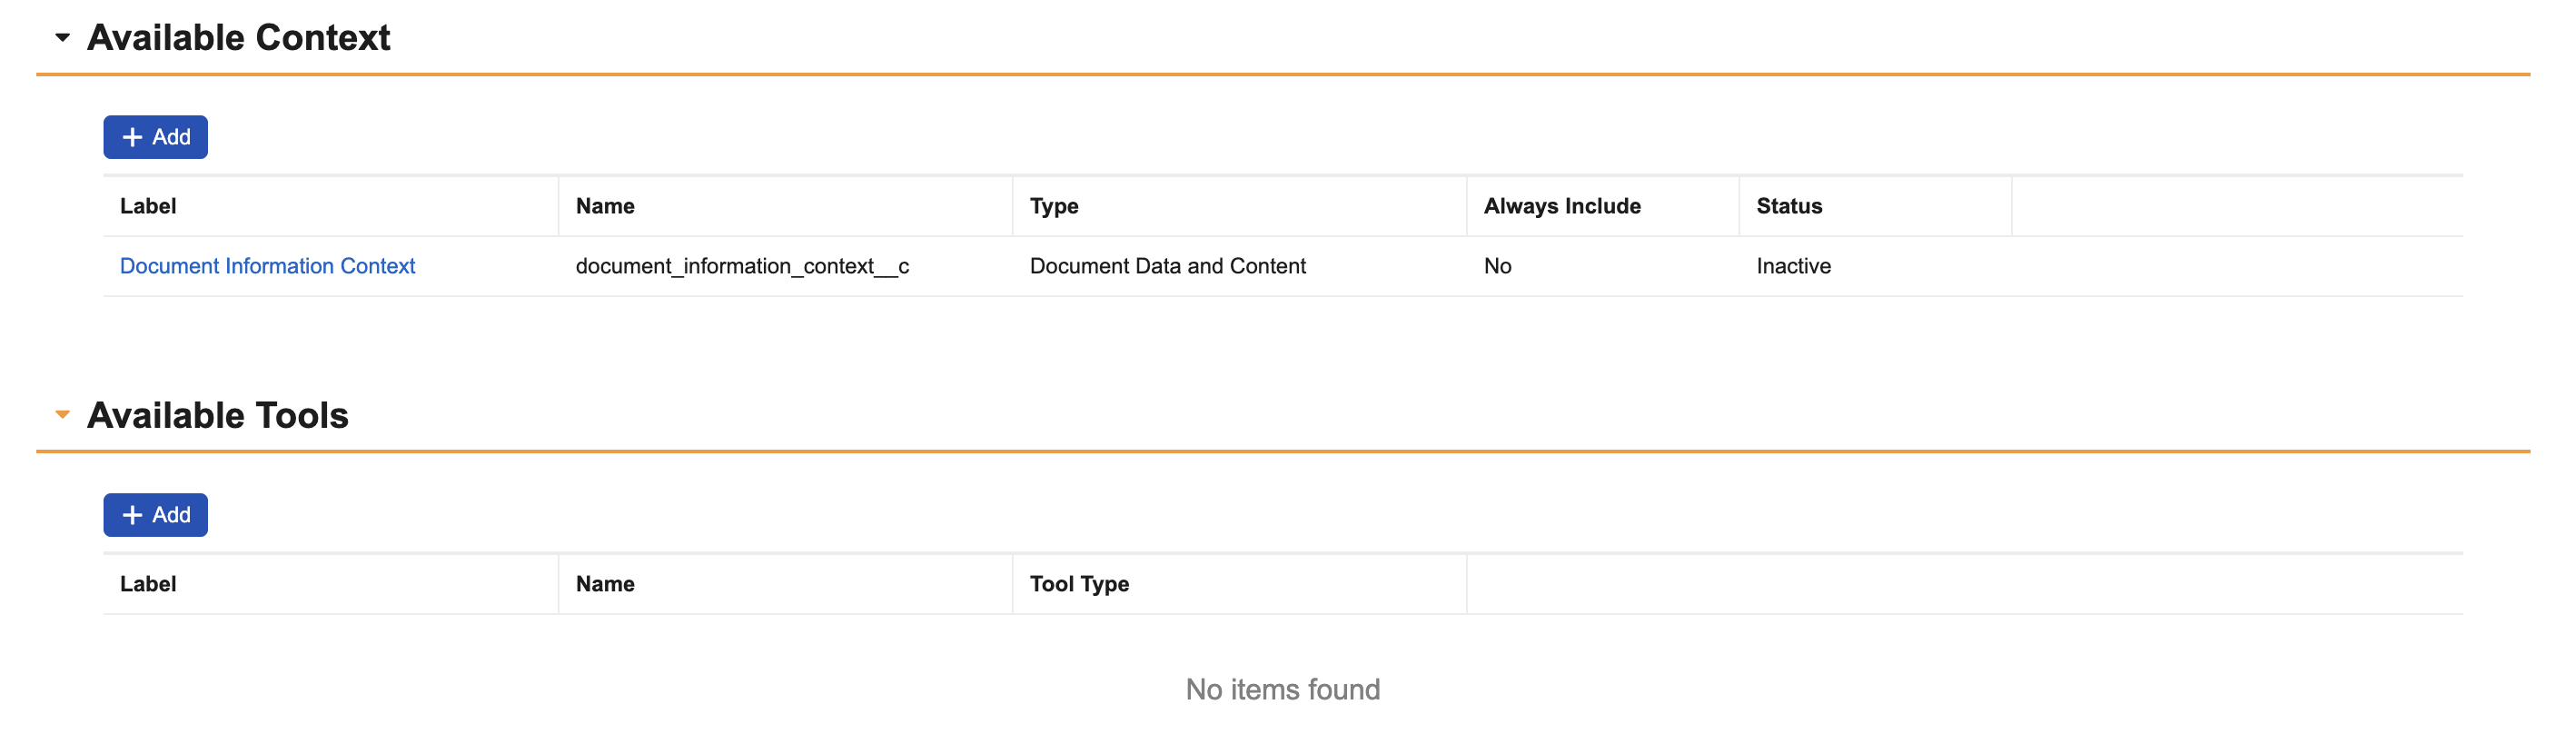
Adding Agent Context and Tools to an Action
You can assign agent context and agent tools to the agent action after it is saved.
To add agent context and agent tools:
- On the Agent Action Configuration page, click Available Context or Available Tools.
- Click Add.
- Select the agent context or agent tool from the dialog.
- Click OK.
The agent action will now operate within the parameters of the agent context and/or agent tool you assigned.
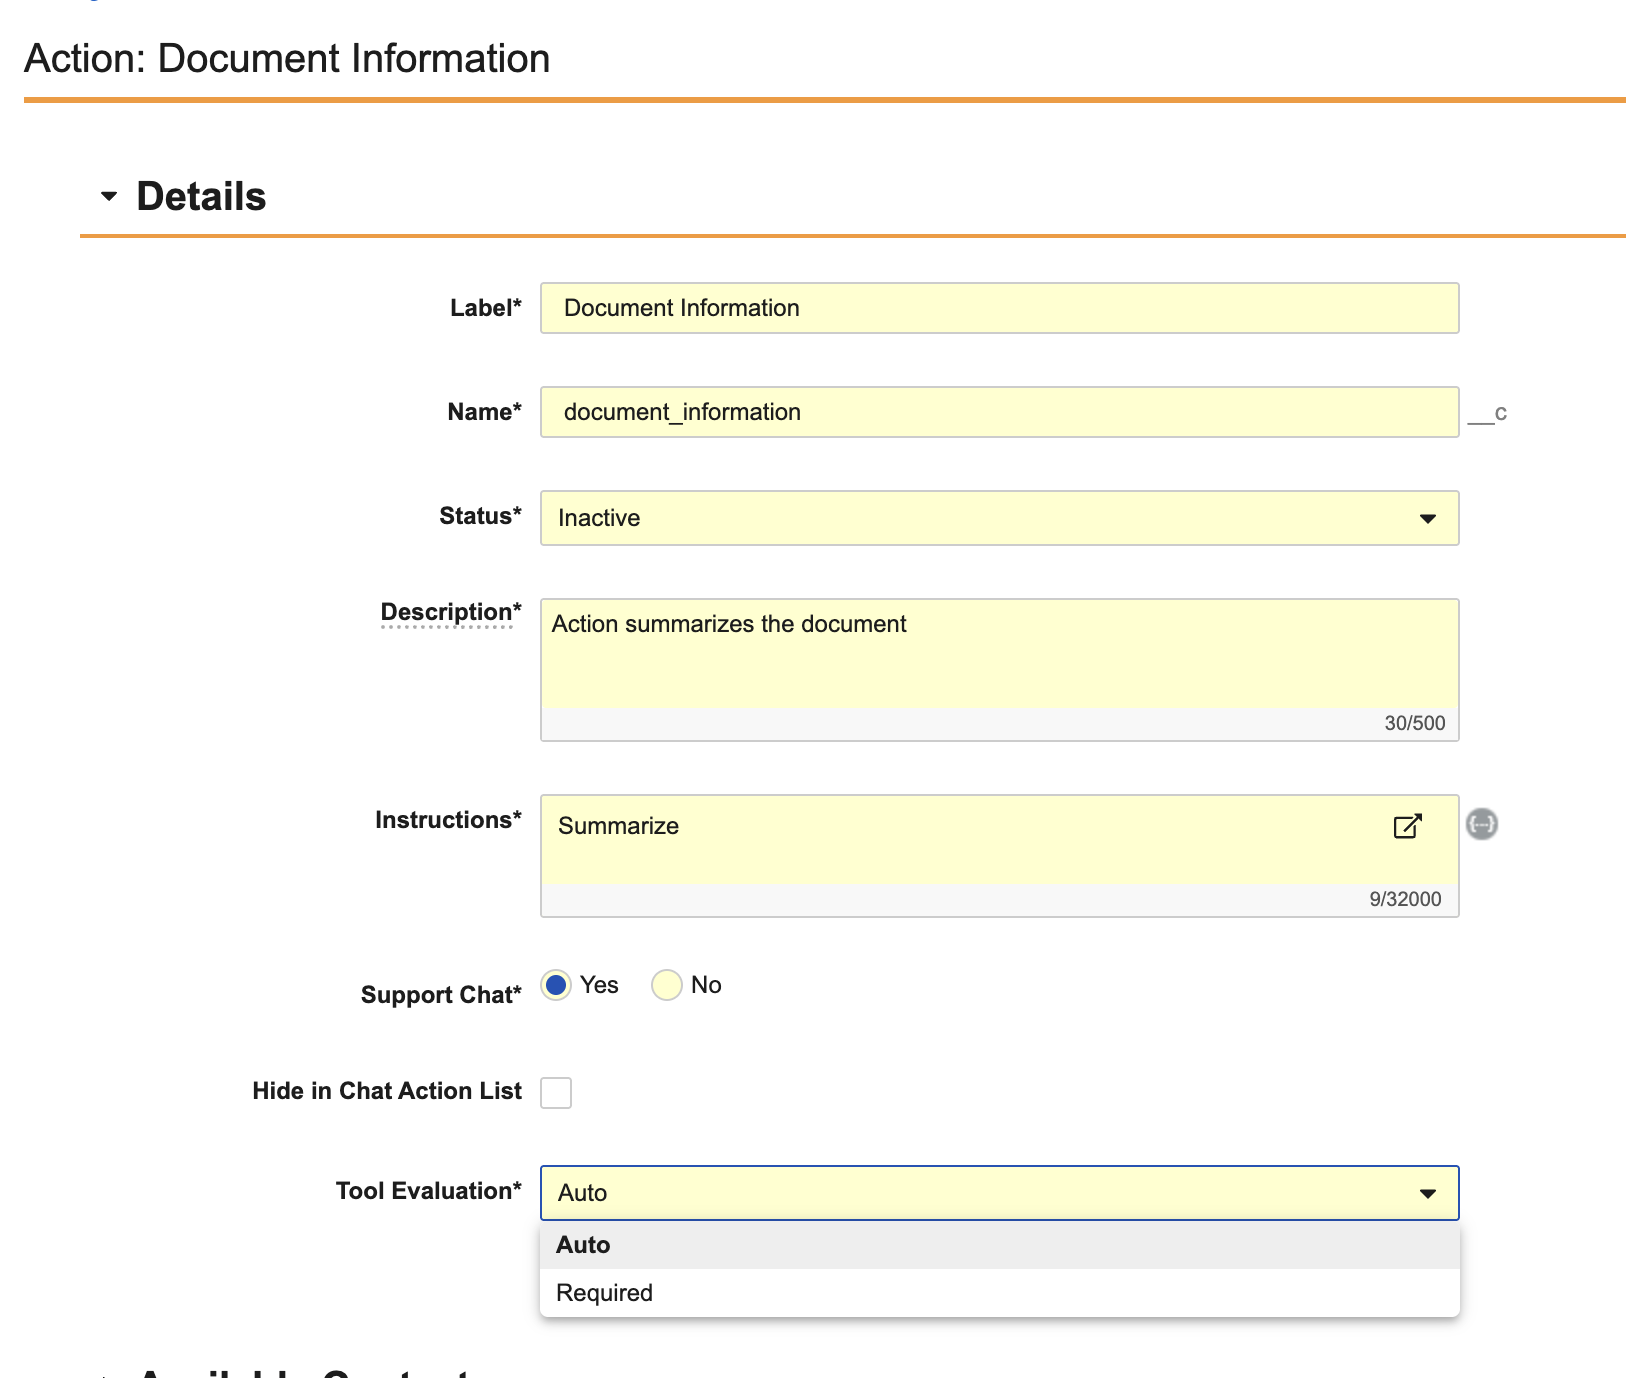
Once the agent action is saved, click Actions > Edit. Then, in the Tool Evaluation drop-down, select Auto to allow your LLM to decide when to execute the agent tool. Or, select Required to prompt your LLM to use the agent tool each time the agent action is executed.
Limits
- You can create up to 500 custom agents per Vault.
- An agent can contain up to 20 agent actions, agent contexts, and agent tools.
- If Images is selected from the Include Document Content drop-down, only the first 20 pages are included.
Related Permissions
The following permissions control your ability to configure agents:
| Type | Permission | Access Details |
|---|---|---|
| Admin | Admin: Agents: Read, Create, Edit, Delete | Ability to view, create, edit, and delete agents. |
| Admin | Admin: Tools: Read, Create, Edit, Delete | Ability to view, create, edit, and delete agent tools. |
| Agents | All Agents: Execute | Ability to select all agent actions within Veeva AI Chat. |
| Agents | [Agent]: Execute | Ability to execute a specific agent and their configured agent actions in Veeva AI Chat. |
| Objects | Agent Instance: Read | Ability to view the Agent Instance object. |
| Objects | Agent Action Execution: Read | Ability to view the Agent Action Execution object. |
| Applications | Vault Actions: Veeva AI Chat: Use Chat | Ability to view and interact with Veeva AI Chat. |